Tuesday, March 22, 2011

Remodeled Dining Buffet

First of all, if my grandmother reads this, she will absolutely hang me. She had given me this old dining buffet with a hutch which is beautiful. However,  it just needed to be updated just a smigin to this era. That's a proper form of measurement right?

We don't currently have a dining room table, but within the next few years, I'll find a way to convince hubby that it's not just a waste of space.

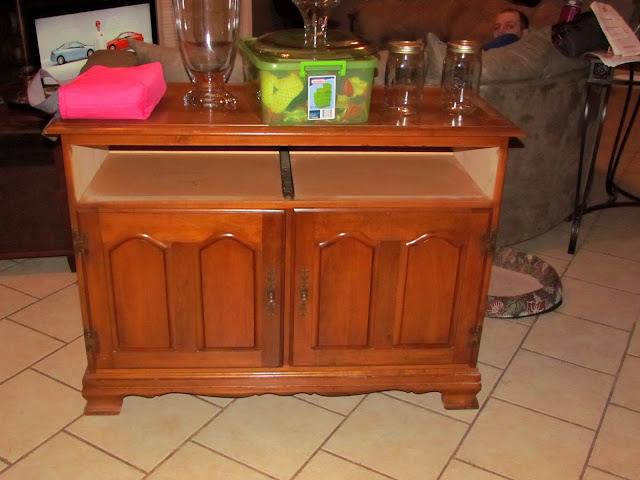
So this is what I started out with...

I recently unloaded the car so it's quite a mess. Note to self - Clean the house.
Since this piece of furniture was real wood and still in great condition, I decided to prime it up before painting. I took drawers, doors and screws out and patched all the holes. I think primed every part that I was going to paint.

After making a few modifications and about 2 coats of black paint, this is what it turned out to be. I'm very happy with it. Now I'm working on making baskets of some sort to put on the shelves. They're just dying for some attention.

{After}

{Before}


I think it looks great and will work just as well with a dining room set when we decide to get one. 

Just to follow up; here are a few painting furniture tips...
1. Before painting, sand down the furniture. This allows for the paint to adhere better and gives a fresh surface.
2. Priming before you paint can be pretty important. If you don't, the paint will not stick and will just peel right off especially with laminate. I suggest having your primer tinted if working with dark colors.
3. Make sure you put enough coats on and get in the little crevices. I use a roller and then a regular paint brush to get into the small spots.
4. Let it dry! : ) I know I have a problem with this and when I let my excitement get the best of me, I later pay for it and have to remove paint from something or repaint a certain area.

Sunday, March 20, 2011

Jute Decor Spheres

This is one of my favorite Pottery Barn/Pier 1 knock offs. I got an apothecary jar at the new Kroger Marketplace near our home... just $14.00!! I of course couldn't resist. So then of course I needed something to fill it with. Instead of spending $5.00 a ball at one of my faaaaaavorite stores I decided I'd buy a pack of of 6 styrofoam balls at Walmart for about $3.00 and cover them with my jute string I already had.


Don't mind the mess in the background : ). It was midterm week and not much got done.


In order to get this to stay, I just used a hot glue gun. I just started the string in the middle and started wrapping it around until I got to the other end. I think they came out great.


 I LOOOOOOOVE IT!

Tuesday, March 8, 2011

Bathroom Shelving

I came across an old unfinished shelf I had from the old house and was trying to think of a way to use it. I knew I needed a "hook" system of some sort in the bathroom for towels, robes, clothes... you know, all that stuff that gets hung over the shower rod or ends up on the floor : ). Since it was free, I figured it would be a perfect opportunity to test my staining skills - I might have to eat those words later. So I pulled out some walnut stain I had left over from something else and went to town.


You'll probably notice my hardwood floors in the background : )... that would be a lack of judgment caused by my impatience and the fact it was raining outside and 40 degrees. *Note to hubby: we need a heated garage* I made sure that the area I was working with was completely covered though.

I got it stained and let it dry. Hung it up on the wall and added 2 hooks below for towels and what not. The hooks were purchased at Walmart in a bronze finish for about $2 each.

{Before}
 
{After}

Much better I think and I have somewhere to put our stuff. Now I just need my cricut machine I've "requested" for my birthday. : )

I'm in the middle of redoing the master bathroom so I'll add full pictures soon.

Monday, March 7, 2011

Ribbons, bows, oh my!

Just another thing to add to my plate right? : ) Of course!! I definitely enjoy a little sewing. I also recently acquired an embroidery machine so I've gone nuts with it! Here are a few things I've made so far.

Also, everything I've made is for sell. I already do special orders for family, friends, etc. Feel free to contact me at Ashamrick@aol.com.

{Hair Bows}

{Burp Cloths}

{Applique Onesies}

{Pacifier Pals}

{Pacifier Clips}

{Jewelry Sets}

Just a little extra of what I do in my down time. Not that I have that much to spare, but gotta keep myself from going crazy : )

Sunday, March 6, 2011

Corkboard Cabinet Door

Not sure about you guys, but loose papers like take out menus, coupons, phone numbers, intructions (Anything!!) hanging out on my fridge drives me nuts : ). And you always get those heavy pieces that regardless what magnet or how many of them you use, it still slides to the bottom. Am I right? So of course, my wheels started turning with ideas. Ironically while I was at work one day cleaning out a spare office, I came across a spare corkboard so I thought, hmm I'll just take it home and cut it out.... Didn't work.... Why? : ) because it didn't dawn on me that it might be glued... duh Ashley.

Lesson learned. So I made a trip to walmart and they have a pack of 4 12x12 corkboard pieces that didn't cost much.


I laid out the pieces how they'd be placed inside the cabinet door and marked where they needed to be cut.


I got all of my pieces put together and put some glue on the back. The set comes with square foam sticky pads to go on the back, but they've never worked for me and I have no intention of taking this down for a long time. So I used tacky glue and then a little gorilla clue.


I finally got all the pieces up and let it dry.


: ) I'm sure it'll be cluttered in no time.

Saturday, March 5, 2011

Jute Cloche

I caved! Made a trip to Goodwill and I had no idea it would be so addicting! I can't believe I haven't been going before. It's a DIYers dream. I tried to control myself a bit so it cost me about $16.00 for all of this. The cheese tray being the most of it. I wasn't going to get it, but just kept walking by and couldn't let it go so I splurged : ) ... $8.00.


I also purchased a brand new looking plant with metal pot holder and a small mismatched plate, but it was currently drying from its paint job as I was taking this picture... I couldn't wait : ). I have an idea for each one. Very exciting.

So first project at hand is the Jute Cloche I made. I love it. I used the red candle/vase thing in the picture above, the glass cover for the cheese ball tray and the plate that isn't shown.


I already had the jute (or twine) along with the glue and spray paint. I spray painted the plate with an antique white so I could use it in my kitchen, white was just TOO bright. Next I wrapped the red candle in the jute/twine string.

Honestly, it didn't take me long. I started using the gorilla glue, but it doesn't dry fast so I used my back up tacky glue with gorilla glue so when it dried there would be the extra hold. I finally got that wrapped and secured my ends with just a little extra glue.

Next I placed the plate on top and flipped it over. I traced a circle around the top of the candle so I would know it was centered. Placed glue on the rim of the candle and placed it on the plate. Flipped it over to dry and stuck the glass over on top and this is what you get.
I've very happy with it. And I can always change the color of the plate when I change my mind. : )


Tip Junkie handmade projects